Overview
Procedure
Toolbox

Anchoring Phenomenon

Sewage water is consumed by people, but they do not get sick.

Lesson Concept

Ask questions based on observation, then identify questions that can be investigated to identify patterns in the type and quantity of matter in the town water samples.

Identified Problem

Water collected from a town may be contaminated. The town officials are requesting help to design a process that will identify the particles in the water and then clean the water.

Standards

Click here for NGSS, CCSS–ELA and Math, and California ELD standards.

Time | Materials | Advance Preparation

Time

3 hours 50 minutes

Part Iwith optional explore, 1 hour 25 minutes + evaporation time
15 minutesEngage
30 minutesExplore 1
30 minutesOptional: Explore 1a
10 minutesExplain 1
Part II2 hour 25 minutes
30 minutesExplore 2
45 minutesExplain 2
40 minutesElaborate/Evaluate

Materials

Whole Class

Items for making the solution for the filtration system (add other items you might have such as sponges, other fabrics, cotton)

  • 20 paper bowls
  • 20 8-oz. clear plastic cups
  • 20 4-in. squares of screens
  • 20 4-in. pieces of cheesecloth
  • 20 small shallow plastic bowls
  • 2 1-quart water containers
  • 20 plastic spoons
  • 20 1-inch round magnets
  • 20 coffee filters
  • 1 paper towel roll
  • 30 hand lenses
  • 12 3-oz. small cups
  • 4 small digital kitchen scales
  • 15 tablespoons (kitchen measuring type)

Groups (Optional activity in Explore 1) (Groups of 4)

  • 4 12-oz. jars
  • 2 cups water
  • 6 cups granulated sugar
  • 4 wooden skewers to hang in jars about an inch from the bottom
  • 4 clothespins
  • Food coloring

Individual

Advance Preparation

  1. For each student, make a copy of 5.4.H1: Separating Mixtures, 5.4.H2: Exit Ticket, 5.4.H3: Environmental Engineer Design Plan, 5.4.H4: Sugar Water, and 5.4.H5: Rubric.
  2. For some specific strategies, explanations, and helpful ideas for doing engineering with fifth graders, review Chapter 11 of the California Science Framework (see references), particularly pages 1478–1484 and 1489–1490. These pages also provide explanations and specifics for the engineering design process.
  3. Preview The Engineering Design Process: A Taco Party video to determine if you want to use it.

Part I

Engage (15 minutes)

Use patterns to ask questions to identify unique properties of matter.

  1. Ask students to discuss with a partner this prompt: “What are some properties of matter that you investigated in our last lesson?” Ask partners to review their data from 5.3.H4: Mixing Matter Observations, paying attention to their observations before and after adding water to each substance. What patterns did they notice? ESRs: some mixed and stayed clear; others did not mix; some looked like they disappeared, but we know that they are still there; the particles are just too small to be seen.
  2. Show the cups saved from Lesson 3: Properties of Matter where substances were dissolved in water. Depending on how the solutions were left, there should now be crystals or film residues forming on the craft sticks left in the cups. Have students respond in their science notebook to each of these prompts:
    1. What do you notice about the water in the cups?
    2. How do you think these crystals and residue formed?
    3. What are these crystals and residue?
    4. How can these crystals and residue help us solve the problem of cleaning the contaminated water in the town water samples?
    5. What new questions do you have?
  3. After students have sufficient time to think and write in their science notebook, have them share responses with the class. Add new questions to the Design Solutions Question Board.
  4. TEACHER NOTE

    Focus on the “cleaning the water” section of the Design Solutions Question Board.

    Possible Extension: Students may have questions about preventing contamination of water. If so, add that category to the Design Solutions Question Board. If students do not yet have these questions, it is likely that these sorts of questions will emerge soon, at which point the category can be added. Water protection and preservation are not addressed in this learning sequence, but it can be added as an extension or differentiation strategy at the end of the sequence; it addresses 5-ESS3-1.

Explore 1 (30 minutes)

Obtain information from a text about how the properties of matter are used to identify materials (patterns).

  1. Tell students, “Today, we are going to read about some ways to separate different types of matter that are mixed together. This may be helpful in answering some of your questions and provide more ideas for separating the “stuff” in the town water samples and ultimately cleaning the sewage water. As we read, draw a star by examples of mixtures that are separated in the real world. Draw a circle around the names of the processes used to separate mixtures. Underline definitions.”
    1. Hand out 5.4.H1: Separating Mixtures. Read aloud or have pairs do a shared reading.
    2. Discuss the processes of filtration and evaporation in the article and address how the new information could be helpful in developing the plan to clean the water in the jars.
  2. Challenge students to identify the difference between the processes of filtration and evaporation by revisiting the definitions in the text. Come to a class consensus on the differences. Encourage students to find evidence in the reading that focuses on the properties of matter that are important in both processes and reference exactly where the information is found in the text. ESRs: Filtration is dependent on particle size, and evaporation is dependent on the types of matter changing phases at different times. Liquid turning into a gas is the phase change important in evaporation (and distillation). Evaporation is dependent on the property of boiling point temperature.
  3. TEACHER NOTE

    Filtration, distillation, and evaporation are addressed in the reading. At this grade level, distillation and evaporation can be lumped together for the purpose of discussion.

    Students are not expected to know boiling points at this grade level, but they should be able to state that there are properties of water and sugar (or other matter) that result in the materials evaporating at different temperatures.

  4. Identify and discuss which process resulted in the formation of the crystals and residue discovered in the cups from Lesson 3: Properties of Matter and examined in Step 2 of this lesson.

Explore 1a: Optional (30 minutes, plus overnight for evaporation)

Conduct an experiment of making rock candy to identify the process of evaporation.

    TEACHER NOTE

    If students have difficulty understanding evaporation, have students create “rock candy” to develop a connection to the process. The directions below will yield 4 rock candy sticks of the same color. You might want to ask what color students want, and then group them by color choice to make their candy. If all of the ingredients are clean, students can eat the product!

    Teacher prep: Clean the glass jars thoroughly with hot water; cut wooden skewers so that they hang about 1 inch from the bottom of the jars. Find spring-loaded clothespins that are at least the length of the jar mouth.

  1. Ask each student to wet their wooden skewer with water and roll it in granulated sugar. This base layer gives the sugar crystals something to grab onto when they start forming.
  2. Ask groups of four to create their sugar syrup. Place the water in a medium-sized pan and bring it to a boil. Begin adding the sugar, 1 cup at a time, stirring after each addition. You will notice that it takes longer for the sugar to dissolve after each cup you add. Continue to stir and boil the syrup until all of the sugar has been added, and it is completely dissolved. Remove the pan from the heat.

    Note if you are uncomfortable with students doing this, set up a station in the front of the classroom where you can monitor this process.
  3. Have students add 2–3 drops of their favorite food coloring and stir it in to ensure an even, smooth color. Then allow the sugar syrup to cool for 20 to 30 minutes.
  4. Ask students to rinse the prepped jars with hot water, then pour the syrup into them.
  5. Ask each student to use a clothespin as a horizontal holder to lower one sugared skewer into each jar until it hangs about 1-inch from the bottom. It should not touch the bottom of the jar.
  6. WestEd [CC BY-NC-SA 4.0]
  7. Ask students to carefully place their jar in a cool place, away from harsh lights, where it can sit undisturbed. Cover the top loosely with plastic wrap or a paper towel.
  8. TEACHER NOTE

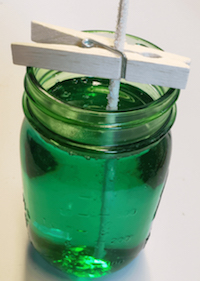
    You should start to see sugar crystals forming within 2 to 4 hours. If you see no change after 24 hours, try boiling the sugar syrup again and dissolve another cup of sugar into it. Then pour it back into the jar and insert the skewer again.

  9. Allow the rock candy to grow until it is the size you want. It may take several days. Don’t let it grow too wide, or it might be impossible to remove from the jar.
  10. Note that a top layer of crystal will form. This is okay. Once the candy has reached the desired size, break up that top layer of crystal with a fork before removing the candy.
  11. Transfer the rock candy to an empty jar or glass (keep the clothespins to balance it) and allow it to dry for 1 to 2 hours, then enjoy or wrap in plastic wrap to save for later.

Explain 1 (10 minutes)

Communicate information about properties of matter to make predictions based on size.

  1. Students write a response on 5.4.H2: Exit Ticket for each of these questions:
    1. How does understanding properties of matter help us use filtration to identify materials?
    2. How did the crystals and residue form in the cups that were left out from the last lesson?
    3. Predict what would happen if a mixture of sand and water was left to evaporate.
    4. Based on your learning so far, what suggestions would you give city leaders regarding the neighboring town’s drinking water problem?
  2. Students discuss their responses and determine if they can add any evidence or new questions to the Class Question Board. Collect the 5.4.H2: Exit Ticket.
  3. Provide feedback to 5.4.H2: Exit Ticket responses and return responses to students by Step 15.
  4. TEACHER NOTE

    Share with students some response groupings such as “I notice that about one-third of the class said _____. And a few said _____. “ Or “I noticed that a few people said _____ (some interesting or outlandish response).” Do this for each of the questions. Find responses that stimulate interesting discussions and promote ideas for solutions to determine the materials in the town water samples.

    TEACHER NOTE

    If necessary, remind the students that neighboring communities are concerned about the local water sources for the community. Many people believe that the water sources may have been contaminated because the police found empty bags of sugar, salt, iron filings, and sand near the local water sources. People are concerned that the only way to save the drinking water is to determine what is in each of the local water supplies.

    For more information on engineering practices, read chapter 13 of Helping Students Make Sense of the World Using Next Generation Science and Engineering Practices by Christina Schwarz, Cynthia Passmore, and Brian J. Reiser.

Part II

Explore 2 (60 minutes)

Define the problem and design a solution to separate and identify materials based on their properties.

  1. Remind the class that they have been hired as environmental engineers to solve a problem. Ask, “What is the problem we are trying to solve? What are some issues to consider when thinking about how to resolve the problem?” ESRs: The water is contaminated so we have to think about how to get the contaminants out of the water. We have to make observations and use of the properties of matter to identify and quantify the matter in each water sample, and then a design for a separation process can be made.
  2. Distribute 5.4.H3: Environmental Engineer Design Plan and have students record the problem in the box labeled #1. If needed, students can be provided with this sentence stem:
    _____ needs a way to _____ so that _____.
    ESR: The town needs a way to identify matter in the water so that the contaminants can be separated from the water, making the water safe for drinking.
  3. Ask table groups to identify the criteria that must be met in order to successfully resolve the water problem. Ask groups to discuss what successfully solving the problem would look like. Ask groups to share ideas and then as a class, agree to the criteria that will be used to determine a solution to the problem. Ask students to record the agreed-upon criteria in the box labeled #2 on 5.4.H3: Environmental Engineer Design Plan.
    • What are some things that are important when we consider drinking water?
    • Based on these important things, what would a successful process need to do if the goal was safe drinking water?
    ESRs: The visible particles will be removed from the water; no crystals or residue will be left when a small sample of water is evaporated. It is helpful to have table groups rank and order the criteria from most important to least important. This ranking can help teams make design decisions later.
  4. TEACHER NOTE

    Criteria are the specific qualities of a successfully designed solution. For example, strength, durability, reliability, and speed can all be criteria for a design. If students need a reminder, play The Engineering Design Process: A Taco Party video, which compares the engineering design process to hosting a taco party.

  5. Ask table groups to determine the limitations that are present in creating a solution to this problem. Display the materials that are available for use. (See materials list.) Provide names for items if students ask but refrain from providing details on ways to use the tools.
  6. Ask table groups to share ideas, and then as a whole class agree to the constraints that will be imposed on the design solution. Then have students write the constraints in the box labeled #3 on 5.4.H3: Environmental Engineer Design Plan.
  7. TEACHER NOTE

    Constraints describe the limitations on a design, such as resources (e.g., time, materials, and funds).

    You can set some of the constraints such as Internet use or whether other materials can be used besides the ones you’ve provided. You can impose a maximum funding limit as long as you provide material item costs so that groups are limited to purchasing materials within a fictitious budget.

    Ranking the importance of the constraints can also be helpful for group discussions.

  8. Students review their exit slip responses and feedback from Step 7 and discuss with their group this prompt: “Thinking about your lesson experiences, what are some ways that your group can solve this problem and use properties of matter to first separate and then identify the matter?” Have them record the scientific information they know in the box labeled #4 on 5.4.H3: Environmental Engineer Design Plan.
  9. Ask table groups to design and write a process/plan in the box labeled #5 on 5.4.H3: Environmental Engineer Design Plan. The plan must result in a solution to the #1: problem they identified, which most closely meets #2: the criteria they established within #3: the limitations they identified using the #4: scientific information they learned in the previous lessons. Circulate and encourage groups to address how data will be collected. This data can be qualitative and/or quantitative.
  10. TEACHER NOTE

    If necessary, review criteria for observations: Use qualitative characteristics (color, shape, texture, smell, but NO TASTING!) and quantitative characteristics (data resulting in values/numbers); based on facts, NOT opinions.

  11. After groups have time to brainstorm, have a whole-class discussion of the appropriate types of data to collect. You may want to discuss the benefits of conducting multiple trials in an experiment. Ask, “How can we use math to help describe and measure this scale of filtration?” Facilitate a class discussion on the importance of conducting multiple trials to validate results. ESRs: We can collect data on the amount of water going into the filter and how much is coming out. We can compare the color before and after the filtration process. We can repeat our process multiple times.
  12. Ask table groups to make a prediction stating why their plan will work. They should explain why each part of their plan will work to separate substances from the water. Students should justify the order of their steps in terms of why they think it will allow for the separation of each substance. You can provide this sentence frame to guide them:
    If I _____, then _____ would happen because _____ has shown to be effective for this phase of the solution to the problem.
  13. TEACHER NOTE

    Differentiation stragety

    If students are familiar with the crosscutting concept Systems and System Models, then a sketch of their process can be drawn as a system, the components labeled, and the interactions described instead of writing out the specifics for each part of their system.

Explain 2 (45 minutes)

Analyze and interpret plans to identify materials based on their properties.

    TEACHER NOTE

    By the end of grade 5, students are expected to have the skill to “respectfully provide and receive critiques from peers about a proposed procedure, explanation, or model by citing relevant evidence and posing specific questions.”

    For more information on this SEP, read chapters 11 and 13 of Helping Students Make Sense of the World Using Next Generation Science and Engineering Practices by Christina Schwarz, Cynthia Passmore, and Brian J. Reiser.

  1. Conduct a table group feedback review of the plans (similar to a gallery walk). One group member remains at the table to present the plan to visiting classmates and receive feedback/questions while other group members visit different groups to provide feedback on their proposed procedures.
  2. Direct students to use green sticky notes to identify where the plans are valid and to use yellow sticky notes to write probing questions where the plans need more thought. Circulate, providing feedback and asking probing questions as needed.
  3. Hand out 5.4.H5: Rubric and tell students to consider only the first two rows at this time (defining problems and developing and using models). Ask table groups to reconvene, consider their peer feedback, and use the descriptions on the rubric to modify their plan.
  4. Tell table groups that they will address the rest of the rubric and complete the remaining boxes on 5.4.H3: Environmental Engineer Design Plan in the next lesson.

Elaborate/Evaluate (40 minutes)

Communicate information including a model for a design solution to identify materials in a sugar water solution.

  1. Ask students to write in their science notebook a reflection on what they have learned about the engineering design process. If they have any new questions, ask them to write them on a sticky note and place them on a parking lot poster.
  2. TEACHER NOTE

    At the end of the entire sequence (after Lesson 5: Separating Mixtures), address the questions on the parking lot sticky notes by asking students to research online for answers or by having an engineer come to talk with students to address the questions.

  3. Add the agreed-upon problem, criteria, and constraints to the third section of the Design Solutions Question Board (cleaning the water). In Lesson 5: Separating Mixtures, the student-designed plans will be tested and results will be added as final pieces of evidence.
  4. Have students individually complete 5.4.H4: Sugar Water to demonstrate their understanding of:
    1. a small quantity of matter (sugar) existing in a larger quantity of other matter (water)
    2. how to draw a model demonstrating their understanding
    3. designing a process to provide evidence
  5. Write the letters A-F on the board, leaving space to record the numbers of students who chose each. Then ask those who chose A to stand and choose one or two to explain their reasoning. Repeat for all answers thru F. (The correct answers are C, D, & F.). Explain to students that in grades 6–8 they will continue to build their understanding about what happens to substances when they are dissolved in a mixture.
  6. Collect 5.4.H4: Sugar Water and review the student responses. The responses will provide you with information as to what the students still do not understand about mixtures.

References

California Department of Education. (2016, November 3). 2016 Science Framework. Retrieved July 14, 2020, from https://www.cde.ca.gov/ci/sc/cf/cascienceframework2016.asp

Keeley, P., & Tugel, P. (2012). Uncovering Student Ideas in Science, Volume 4: 25 New Formative Assessment Probes. Arlington, VA: NSTA Press.

PBS Learning Media. (2020, June 01). The Engineering Design Process: A Taco Party. Retrieved July 14, 2020, from https://ca.pbslearningmedia.org/resource/tacoparty/tacoparty/

Schwarz, C. V., Passmore, C., & Reiser, B. J. (2017). Chapters 11 and 13. In Helping Students Make Sense of the World Using Next Generation Science and Engineering Practices. Arlington, VA: NSTA Press, National Science Teachers Association.

Resources


Download 5.4.H1

Download 5.4.H2

Download 5.4.H3

Download 5.4.H4

Download 5.4.H5