Overview
Procedure
Toolbox

Anchoring Phenomenon

Sewage water is consumed by people, but they do not get sick.

Lesson Concept

Make observations and measurements to identify patterns of materials by their properties.

Identified Problem

Water collected from a town may be contaminated. The town officials are requesting help to design a process that will identify the particles in the water and then clean the water.

Standards

Click here for NGSS, CCSS–ELA, and California ELD standards.

Time | Materials | Advance Preparation

Time

4 hours 15 minutes

Part I2 hours 30 minutes
45 minutesEngage
60 minutesExplore 1
45 minutesExplain 1
Part II1 hour 45 minutes
60 minutesExplore 2
30 minutesExplain 2
15 minutesElaborate/Evaluate

Materials

Whole Class

  • Town Water Samples (from Lesson 1: Town Water Samples)
  • Chart paper
  • Markers
  • 4 small kitchen digital scales
  • 1 box of cereal fortified with iron
  • 2-inch magnet
  • 1 sandwich zipper bag

Group (Groups of 4)

  • Large whiteboard (or chart paper) and markers
  • Steel ball bearing (size of a marble)
  • Glass marble
  • Rubber ball (about 2 inches in diameter)
  • Pom-pom (½-inch or less in diameter)
  • Small pebble
  • Aluminum foil (2-inch square)
  • Magnet
  • Small paper clip
  • Iron nail
  • Steel nail
  • Mirror (approximately 2-inch square or round)
  • 1-inch washer
  • Magnetite (available on the internet)
  • For making a circuit to test for conduction of electricity:
    • D cell battery
    • Battery holder
    • Light bulb
    • Bulb holder
    • Three wires with alligator clips at ends
  • Aluminum baking pan (9-inch x 12-inch)
  • Penny
  • 5.3.G1: Property Labels
  • Envelope

Group (Groups of 2)

  • 5 clear 8-oz. cups, each filled with ½ cup water
  • 5 small 3-oz. disposable cups, one of each will contain:
    • 2 tsp. sugar
    • 2 tsp. sand
    • 2 tsp. powdered drink mix or instant tea
    • 2 tsp. baking soda
    • 2 tsp. flour
  • 1 digital kitchen scale
  • 5 wooden craft sticks
  • 2 hand lenses

Individual

Advance Preparation

  1. Crush all the fortified with iron cereal and put it into a bowl. Check to make sure that when a magnet is put into the crushed cereal that it collects the iron.
  2. Set up 10 trays using the aluminum container with items to sort in Explore 1: steel ball bearing, glass marble, rubber ball, pom-pom, small pebble, aluminum foil, magnet, small paper clip, iron nail, steel nail, mirror, washer, and magnetite.

    If you need to substitute items, see 5.3.H1: Properties Table for information on the properties the students will use for sorting and find objects that have those properties.
  3. At each table provide a whiteboard and markers for the group.
  4. Print one copy of 5.3.G1: Property Labels for each group of 4 students. Cut a set of labels and place them all in an envelope.
  5. For each student, print one copy of 5.3.H1: Properties Table, 5.3.H3: Exit Ticket, and 5.3.H4: Mixing Matter Observations and two copies of 5.3.H2: Frayer Model.
  6. For Explore 2, set up 5 plastic cups with water for each set of partners. Also, put one of the following into its own small disposable cup: 2 tsp. of sugar, sand, powdered drink or instant tea, baking soda, and flour. Then assemble a tray with the 5 plastic cups with water, the 5 small cups, each with one substance, 5 mixing sticks, 2 hand lenses, and 1 digital kitchen scale.
  7. Make electricity testers, or if you prefer, have each group make their own. Connect one alligator clip to the battery holder and to the base of the light bulb holder. Connect another alligator clip to the other side of the battery holder. Connect a third alligator clip to the other side of the light bulb holder. Place the item you want to test between the two free ends of the clips and see if the bulb lights.
  8. Image via WestEd [CC BY-NC-SA 4.0]

Part I

Engage (45 minutes)

Analyze and interpret data from observations and measurements of patterns that indicate the properties of matter.

    TEACHER NOTE

    Students will review their prior knowledge of the basic properties of matter from second grade. Then they will build on that understanding to address the 5th-grade DCI properties of elements such as magnetism, conductivity (electrical and thermal), reflectivity, solubility, and measurement to identify unknown matter.

  1. Ask table groups to review their models of the Town Water Samples. Which jars contain contaminants? Which jar(s) do not? How do they know? ESRs: jars #1, #2, and #3 are contaminated with observable and non-observable matter. We can observe the black things (iron filings) and the sand in jars #1 and #2. We know there are unobservable particles in jar #3 from the indicator test. Jar #4 does not have contaminants because it stayed clear when tested.
  2. Hold up sample jar #4 and ask students to discuss whether the water in the jar is clean or contaminated in some way that is different from the rest of the jars. To help them in their discussion, ask for other examples where they may wonder if there are very small quantities of matter in other items they consume. (Examples may include bacteria on food, gases in air). Ask several students to share their ideas.
  3. Show students the box of cereal that is fortified with iron and ask, “How can we determine what substances might be contained in items we use every day? What do you think is in cereal fortified with iron?” Ask students to share ideas with a partner, and then reconvene as a class and record their ideas on the board or chart paper.
  4. Ask, “How can we find out what is in this cereal?” ESR: Read the ingredients. Read the ingredients and vitamin/mineral nutrition label aloud. Ask, “Is anything on the list surprising?” Have students discuss with a partner and/or in table groups. Students are likely to be surprised that iron is on the list. (Note: Iron is a mineral added to many cereals.) If they do not ask, wonder aloud yourself why iron would be in cereal.
  5. Ask: “I wonder how we can find out if there is iron in the cereal? I wonder if it is really metal or if there is some other kind of iron?” (e.g., iron dietary supplements)
  6. Have students discuss with a partner their thoughts, ideas or questions as to the idea of iron in the cereal. Discuss the responses and the pros and cons of the strategies suggested. Record students’ ideas.
  7. TEACHER NOTE

    Record responses from students in three columns on your chart. Use these headings:

    How to find out if there is iron in the cerealIs it metallic iron of another form of iron?Questions/Wonderings

    This can be referred to later in the lesson to see if students’ questions were answered and if their ideas for finding out if about iron in the cereal worked.

  8. Ask three students to help with a demonstration. Ask one student to show the bowl of crushed cereal to the class. Then have the student add water to make it soggy and stir. Show the bowl to the class. What do they notice?
  9. Ask the second student to take the magnet and put it inside a sandwich zipper bag, removing the air. Ask the student to swirl the bag with the magnet several times in the watery cereal.
  10. Ask the third student to take the bag out of the cereal and show their classmates what is on the outside of the bag. Either display it under a doc camera or have the student walk around the room.
  11. Ask the students to discuss what the stuff on the outside of the bag is. ESRs: The stuff on the outside is very small and dark. It might be iron because we know iron is in the cereal from the ingredients list.
  12. If it is iron, what property does it have that allowed us to remove it from the cereal? ESR: The magnetic property of iron enabled us to use a magnet to separate it from the cereal.
  13. Connect this activity to the Class Question Board item that asks how we can identify what matter is in the Town Water Samples. Ask students to respond to this prompt in their science notebook: “How can what we just did with the cereal help us to determine if any iron is in each of the Town Water Samples?” Ask a couple of students to share their thinking. Conduct a classroom discussion about how the property of magnetism and the use of a magnet can be used to solve the problem of the Town Water Samples.

Explore 1 (60 minutes)

Test for properties of matter (weight, magnetism, and conductivity) and analyze data to determine patterns.

  1. Continue the discussion asking, “How can knowing the properties of different types of matter help us solve our problem of identifying what’s in the water sample jars?” ESRs: We know there is contamination in our samples and in the sewage water (anchoring phenomenon). Knowing different properties can help us identify was the matter is and figure out how to remove or separate it.
  2. Explain that students will now have the opportunity to explore and identify the properties of various types of matter. Before they get started, ask students how they might make observations of properties. ESRs: We will use our senses; use tools like a magnet, or test it for electrical conductivity.
  3. TEACHER NOTE

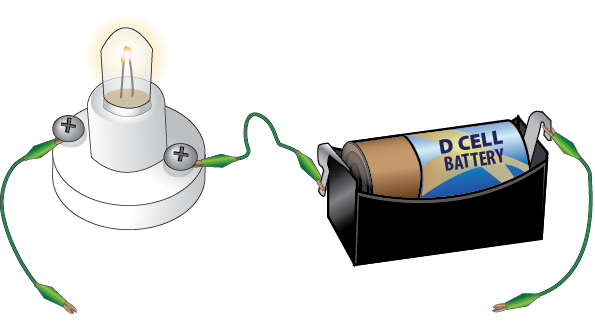
    If students do not mention testing for electrical conductivity, suggest it to them. Fifthgrade students should have prior experience with electrical circuits, conductors, and insulators. If they don’t have this background knowledge, introduce it to them. You could hold up a tester and ask students what they know about it and then build from there.

    Ask if anyone knows how to use the tester and build on the responses. If no one has knowledge of that, show students how to use the tester by placing an object between and touching the two open wires to see if the bulb lights.

  4. Distribute the prepared tray of items to each group, and pose this question: “Looking at these items, what similarities and differences in their properties can be identified in order to sort and classify them?”
  5. TEACHER NOTE

    If you ask students to write, rather than talk about their responses to the question, you can assess prior knowledge of the properties of matter that were taught in second grade. Student misconceptions regarding magnetism can also be assessed at this point.

  6. Ask students to work as a team to sort the items by their properties. On a whiteboard or chart paper, ask students to make a group record showing the items that were sorted and the property used to group them.
  7. TEACHER NOTE

    Use one of these sentence frames as a discussion scaffold if needed:

    One property that these items can be sorted/classified by is _____.

    For example, the _____ can be classified as a(n) _____.

    Another property that these items can be sorted by is _____.

  8. Have teams review their sorting, asking them to compare and contrast their data to find patterns. Ask students to record their ideas in their science notebook.
  9. TEACHER NOTE

    Formative assessment: Students are responding to how they sorted based on the patterns of properties. Students should include magnetism and patterns of similarities of items. ESRs: These items are grouped together because they all are attracted to a magnet; these items are grouped together because they all conduct electricity.

    DCI Support:

    Starting in second grade, students learned materials could be classified by observable properties. In third grade, students learned that magnetism is a force that causes objects to be pushed or pulled. In fifth grade, they understand how this force can be used to identify the properties of matter.

    CCC Support:

    In grades K–2, students developed an understanding that patterns in the natural and human-designed world can be observed. In grades 3–5, this shifts to an understanding that similarities and differences in patterns can be used to sort for designated properties.

  10. Conduct a gallery walk: Each group leaves their sorted items and whiteboard display and visits another group’s board. Students observe similarities and differences in the ways the different items were sorted. Guide students to look for patterns in objects that are sorted in groups. Take notice of any patterns in the way the matter was sorted focusing on the relationships of the items in each group. Ask, “How are the sorting groups of others similar to your sorting? How are they different?”
  11. In table groups, discuss patterns of both differences and similarities that were noticed in the gallery walk. Have each table group share one idea.
  12. Show the class a penny and ask, “Based on the sorting groups you made, what group or groups might this penny fit in?” Distribute a penny to each group to use in the next sorting.
  13. TEACHER NOTE

    This activity can be a quick, whole-group formative assessment of the properties of matter for PS1.A (e.g.: not magnetic, conducts heat, conducts electricity, metal).

  14. Distribute the envelopes containing the labels you cut from 5.3.G1: Property Labels. Discuss and review the labels and units (such as grams, centimeters) that would likely be recorded when scientists measure the various properties. Ask, “Do all properties have units?” (no) Students work as a team to re-sort their items on the tray by the properties on the labels.
  15. TEACHER NOTE

    In the first sort (Step 15) students sorted into their own categories. In Step 21, students are asked to re-sort using the labels as categories. This may provide different categories than the students originally had thought of. It also provides academic language for the categories.

    If needed, help students understand that one of the new properties, weight, will be used as they re-sort objects in the tray. When describing the term weight, do not include any discussion of mass. Instead refer to weight as the heaviness an object has compared to other objects. The purpose is to provide more concrete examples of using the CCC for Scale, Proportion, and Quantity.

Explain 1 (45 minutes)

Communicate information about the properties of matter that can be used to categorize objects.

  1. Distribute 5.3.H1: Properties Table to each student and have students record the items in the appropriate category, based on their sorting. Ask them to discuss how this sorting was different from their original sort. Then have students record in their science notebook the different ways one item can be sorted based on the item’s properties.
  2. Circulate while student teams discuss and describe how they sorted the items and their reasons for sorting the items the way they did. Based on your assessment of student discussions during the team sorts, provide feedback to the class. You might need to explain the new properties including weight (the heaviness an object has compared to other objects) and magnetism (the ability of some metal objects to be attracted to a magnetic force).
  3. Distribute 5.3.H2: Frayer Model and have students write the term magnetism in the oval. Using the general rules or characteristics discussed, have students complete the other squares.
  4. TEACHER NOTE

    A Frayer Model is completed by writing several examples and non-examples of the vocabulary term being defined.

    In third grade, students learned that magnetism is a force that causes objects to be pushed or pulled. In fifth grade, they understand how this force can be used to identify properties of matter.

    Differentiation strategy

    Advanced students can create a Frayer Model for the term weight while the teacher works with students who need more guidance on magnetism. When describing the term weight, do not include any distinction between weight and mass at this grade level.

  5. After completing 5.3.H2: Frayer Model, ask the teams to discuss how magnetism may be helpful in separating matter. How are magnets used in the real world to solve problems? Record their ideas in their science notebook.
  6. TEACHER NOTE

    Magnets are used to separate metals from other trash and lift heavy objects like vehicles at a salvage yard where old vehicles are crushed. Maglev trains like a monorail use magnets. In addition to these physical science uses of magnetism, there are also life science connections to the use of magnetism. Magnetism is used by several species to help with navigation (birds and tiger sharks).

  7. Hand out 5.3.H3: Exit Ticket. Ask students to complete this prompt: “What properties did you use to sort the materials that were collected in your properties table?” Collect 5.3.H3: Exit Ticket.
  8. TEACHER NOTE

    The goal of the exit ticket is to get students to communicate how specific properties can be used as a process or method to separate matter that might be in the Town Water Samples. Students are making a claim about the merit of a solution by citing evidence which they will use in the next lesson.

    Review the exit slips for student understanding before beginning Explore 2 (e.g., did they relate the idea of the small particles of iron to small weight/quantity?). Adjust Explore 2 accordingly.

Part II

Explore 2 (60 minutes)

Conduct an investigation to observe the property of solubility of different materials using scale and proportion.

  1. Return student’s 5.3.H3: Exit Ticket for their review. Address any questions/concerns.
  2. Share with students some interesting questions you gathered from the last question on the 5.3.H3: Exit Ticket.
  3. Show Town Water Sample jars #1, #2, and #3 again. Ask students, “How could you use the properties that we just learned about to separate the matter that is in these jars? Have students discuss with a partner, then class share.
  4. Refer to the Class Question Board, finding one that relates to matter mixing with other matter. Ask students if they can think of examples of different types of matter mixing together. ESRs: Trail mix has nuts and fruits; punch is made from mixing powder with water; chocolate syrup is added to milk to make chocolate milk. Then ask, “What examples do you know of mixed solutions that appear clear but have something in them?” ESRs: salt water or sugar water. If you do not get this response, see the Teacher Note box.
  5. TEACHER NOTE

    This is the students’ first exposure to the property of solubility. The purpose of your questions is to elicit student’s background knowledge. Hopefully from the questions that students have asked, one relates to mixing. If not, ask the question: “What would be an important property of matter when making lemonade with fresh lemons? If you want your lemonade sweet, what might you do?” ESR: Add sugar. Ask, ”What must the sugar do to make the lemonade sweet?” ESR: Dissolve in the lemon juice. Ask, “What does dissolve mean?” Have students discuss with a partner.

  6. Explain that students will have an opportunity to explore their thinking by investigating how different matter mixes with water. Some matter mixes with water, and some matter does not. Ask students how mixing or not mixing with water or another liquid might be an important property to help solve the Town Water Sample problem. ESR: If it mixes, it might change the water like when you put sugar in tea or lemonade to make it sweet. If it doesn’t mix, then maybe it can be removed.
  7. Explain that scientists use a property called solubility to determine if one type of matter can dissolve in another type of matter. Ask partners to discuss what this means for the Town Water Samples. ESRs: We think that in jars #1 and #2 the black things and the sand didn’t dissolve. But we know from using the indicators that there are other particles we can’t see in jars #1, #2, and #3. We think these particles have dissolved.
  8. Distribute the second tray to each pair. Tell them, “To explore your ideas on solubility, you have these materials to work with:
    1. There are five 8-oz. clear cups with ½ cup of water in each.
    2. There are 5 3-oz. small cups with 2 teaspoons of the item labeled on the cup.
    3. 5 wooden sticks for stirring, one for each substance.
    4. Kitchen scale for weighing the matter, before and after the mixing.
    5. Hand lenses for observing each type of matter in the small cups.”
  9. Ask students what data would be helpful to record when mixing materials. ESRs: which ones disappear; which ones don’t mix; how much disappears; is there a color change; does the mixed matter act differently than the original two materials?
  10. Hand out and review the first two columns of 5.3.H4: Mixing Matter Observations. Discuss what words will make helpful observations on 5.3.H4: Mixing Matter Observations.
  11. TEACHER NOTE

    Differentiation strategy

    Allow students to create their own data tables.

  12. Ask students to talk to a partner about the columns on 5.3.H4: Mixing Matter Observations that have to do with weight. Why might weight be an important property of matter? ESRs: If the matter is heavy, it could sink to the bottom; if it’s light, it might stay on top; if the matter disappears, it should weigh less. Chart their responses (to return to after the investigation).
  13. Have a discussion about weighing matter. Ask, “What are the appropriate tools? What should you keep in mind when weighing something?” Have table groups discuss and share ideas. ESRs: need to be accurate in measuring the weight; need to use a scale with numbers; need to “center” the scale so that it starts at zero; need to make sure that you are measuring the weight of the item and not the weight of the item plus the container it is in.
  14. Build on the idea of the weight of the container vs. weight of material if that is brought up by students. If not, introduce that idea. Weigh a cup with water in it and show students the value. Ask, “Is this what the water really weighs?” Allow students time to discuss, and if no one mentions the weight of the cup, then ask: “But what about the cup? Does it weigh anything? How could we find out how much the water actually weighs?” Encourage discussion and additional examples of appropriate methods for collecting data about objects’ weight. It is important to ask probing questions about the standard units used for measuring and reporting weight; that is, in our everyday life, we measure weight in pounds; in our science work, we measure weight in grams.
  15. TEACHER NOTE

    The goal of Step 38 is to get students to realize that they must weigh the cup when it is empty, then subtract the weight of the cup from the weight with the matter inside the cup. When students weigh the small cups of substances, they must weigh the cup separately and subtract the weight of the cup from the weight of the cup with the substance.

    To conserve time, the weight of both the cups (clear plastic and small paper) can be completed in front of the class and the data recorded on the board. Alternatively, have an extra of each cup (empty) on the trays for students to do themselves.

    If students do not know how to use the scales, demonstrate for them.

  16. Explain that students will use the materials on the tray to investigate different types of matter and how they interact with water. They will collect observational data to see which mix in with water and which do not. This data may be crucial in helping them solve the Town Water Sample problem.
  17. Ask students to work in pairs to observe the different materials and record observations on 5.3.H4: Mixing Matter Observations. Allow partners to decide how they will mix the matter with the water. Some may dump it all at once while other groups will be more cautious and pour it in stages. Allow all options. Circulate to hear the discussions students have about their observations as they perform the investigation.

Explain 2 (30 minutes)

Analyze and interpret data from observations and measurements of the properties of matter.

  1. Put these questions on the board and have students discuss each question in their table groups using their data from 5.3.H4: Mixing Matter Observations.
    1. “What did you notice?” ESR: Some matter “disappeared,” some did not.
    2. “Did the matter really disappear? What is your evidence?” ESRs: It looked like it disappeared, but the weight of the water and matter stayed the same, so it still had to be there.
    3. “Which matter dissolved in the water? What is your evidence?”
    4. “Which did not dissolve? What is your evidence?”
    5. “What do you think causes some matter to dissolve in water and other matter to not dissolve?” (The purpose of this question is to get students to look for a pattern that might be helpful for their designed solution and tests to separate the water and contaminants in the town samples.)
  2. TEACHER NOTE

    Students are being introduced to the new element of PS1.A: amount (weight) of matter is conserved when it changes form, even in transitions in which it seems to vanish. Students may think the matter “disappears” or vanishes when mixed into the water, but the weight will indicate that matter is in the water; it’s just not visible. This helps students grasp the meanings of solubility and dissolving.

  3. Review the student thinking from Step 38 and discuss with students how their thinking has changed about materials disappearing.
  4. Distribute another copy of 5.3.H2: Frayer Model, and have students write the term dissolve in the central oval and complete the model. Ask partners to share their ideas. Listen for how students talk about dissolving. You want them to realize that that they know it doesn’t disappear, it just becomes invisible because matter is made of particles too small to be seen.
  5. Assign each table group a solution to keep. (It is fine if there are duplicates as long as all solutions are represented.) Ask them to place their solution on a countertop and label the solution.
  6. TEACHER NOTE

    The retained solutions must be allowed to evaporate so that crystals or a film residue are left behind in the cups. You may wish to have them leave the wooden sticks in the cups so that the crystals and residue can be passed around on the sticks during the next lesson.

    Evaporation depends on many factors and may take longer than expected. A heat lamp can be used to speed up the process. If you prefer, prepare a set of solutions and set them aside a week prior to beginning this exploration.

Elaborate/Evaluate (15 minutes)

Ask questions/define problems to determine how to identify the different materials in water samples.

  1. Look on the Class Question Board for a question similar to “How can we remove the contaminating matter from the water in the jars?” In table groups, ask students to discuss this question. If necessary use prompts such as:
    1. “How could using specific tools, or a process for separation, help identify the matter that might be in the Town Water Sample jars? “
    2. “What tools and processes would you use to clean the water in the jars?” Note: This response leads to Lesson 4: Cleaning Water.
  2. Conduct a brief class discussion using the ideas from the table groups. Ask if there are any new questions to add to the Class Question Board or if any questions can now be deleted.

Resources


Download 5.3.G1

Download 5.3.H1

Download 5.3.H2

Download 5.3.H3

Download 5.3.H4